Making sure your Google documents are accessible supports people who use assistive technologies like screen readers. It also makes the document more usable for all users. In this tutorial we’ll review the most common accessibility issues that should be addressed when creating documents. Attending to these issues will not necessarily ensure full document accessibility but it will significantly improve the accessibility and usability of your Google Docs for all users.
Document Headings
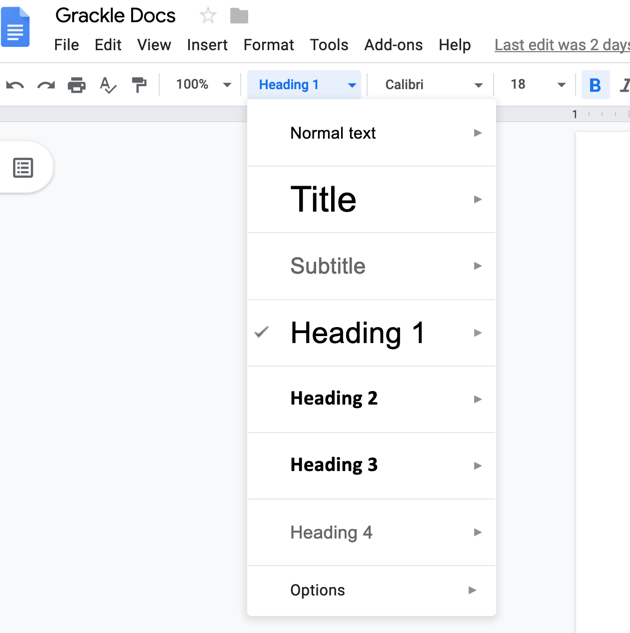
Sighted users often use bold or large fonts to create the visual appearance of headings in their documents. Users with no vision or low vision who use assistive technologies, like screen readers, have no way of understanding these visual cues. It’s important to use heading styles from the Google Docs styles menu to identify these important sections or topics within your documents.
Assign headings based on the hierarchy of your document. The main title or description of the document should begin with a Heading 1; this should be the only Heading 1 element in your document. A Heading 2 can be used for the various main sections of the document - similar to chapter titles in a book. Heading 3 elements can be used for sub-sections contained within a Heading 2 section. Continue adding this hierarchical heading structure to your documents with additional Heading elements (Heading 2,3,4,5, etc.) based on the organization of the document. Never skip heading levels. A Heading 3 element would follow a Heading 2 element, and a Heading 4 element would follow a Heading 3 element. There is no limit to the number of Heading (levels 2,3,4,5, etc.) elements you can use in a document.
To add Headings in Google Docs:
- Select the text that you want to assign as a heading.
- Choose the appropriate Heading style from the Styles menu located to the left of the font styles menu.
Alternative Text (Alt text) on Images
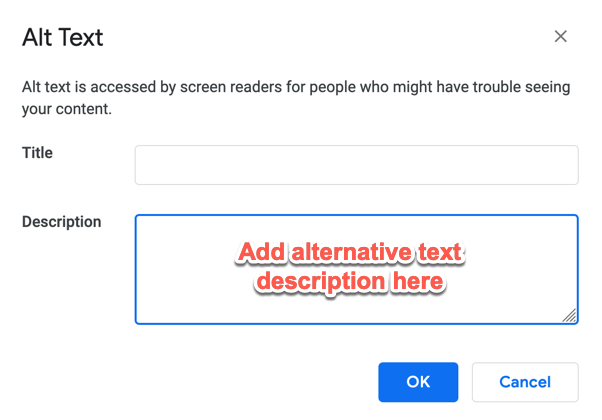
Users with no vision or low vision obtain information provided from images by listening to text-based descriptions called alternative text or alt-text. All images that contain important information should include alt-text. The alt-text should be as concise as possible (up to 150 characters) and describe the content and function of the image. Guidance on what makes effective alt-text varies, but one helpful approach is to imagine describing the image to someone on the phone.
To add alternative text in Google Docs:
- Select the image, right-click and select the Alt-text option.
- Enter descriptive text in the Description box, not the Title box.
Descriptive Hyperlinks
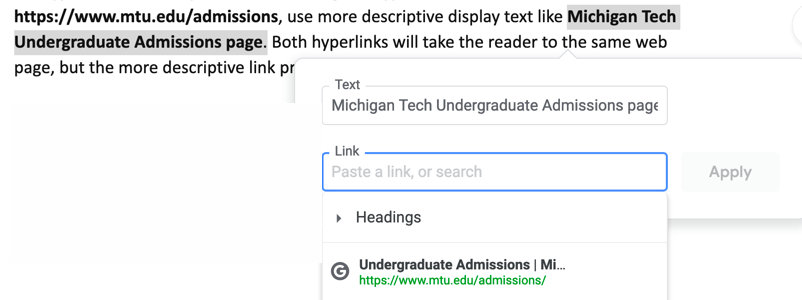
If fully-formed hyperlinks are used as display text, a user who relies on a screen reader or text to speech software can easily become confused as the hyperlink is read out one character at a time. A better option is to use natural language as display text instead of the full hyperlink. For example, instead of using the hyperlink https://www.mtu.edu/admissions, use more descriptive display text like Michigan Tech Undergraduate Admissions page. Both hyperlinks will take the reader to the same webpage, but the more descriptive link provides better context for all users.
To add a descriptive hyperlink in Google Docs:
- Enter the natural language link text into your Google (Doc)ument (i.e., Michigan Tech Undergraduate Admissions).
- Select the link text, right-click and choose Link.
- Confirm the descriptive text in the Text field (i.e., Michigan Tech homepage).
- Enter the full hyperlink in the Link field (i.e., https://www.mtu.edu/).
Avoid Generic Link Display Text
Screen reader users often rely on links to browse all content in a document. To avoid confusion, don’t use generic link display text such as "click here" or "more info." When multiple links use the same link display text, a screen reader user has no way of differentiating between them or their place on the page. By describing the link destination in the display text, the user will know where the link will take them if they select it.
Tables
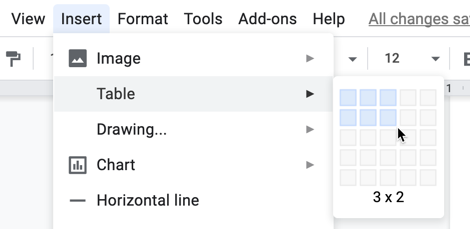
Tables should be used to present information and not as a method of controlling the layout and alignment of information in your document. Column and/or row headers are required to provide the table structure necessary for screen reader users to properly access the table information. Google Docs does not currently provide options to make tables accessible without the use of an external tool. We will use Grackle Docs for this later. A properly structured table allows users to navigate through using only the tab button on the keyboard. Avoid the use of split cells and merged cells in tables. These can create accessibility problems for screen reader users.
To create a table in Google Docs:
- From the Insert tab in the Google Docs ribbon, select the b feature.
- Select the desired row and column configuration for your table.
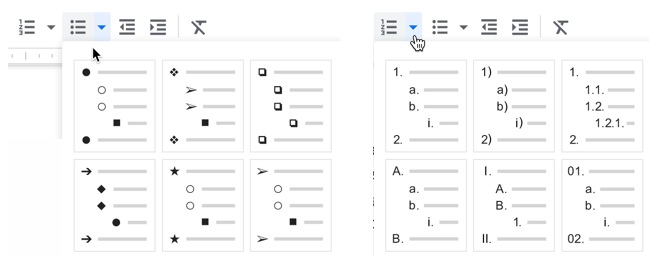
Lists
Lists must have the proper structure to be interpreted correctly by assistive technologies. Visually styled lists with indented rows with dashes and numbers are not accessible. Create lists with the tools available in the main ribbon of Google Docs. Use the numbered list tool when order or sequence is important or the bulleted list tool for unordered lists.
To create a list:
- Click the bulleted or numbered list button from the main ribbon tab in Google Docs.
- Enter your list items.
- Click the list button at the end to close the list tool.
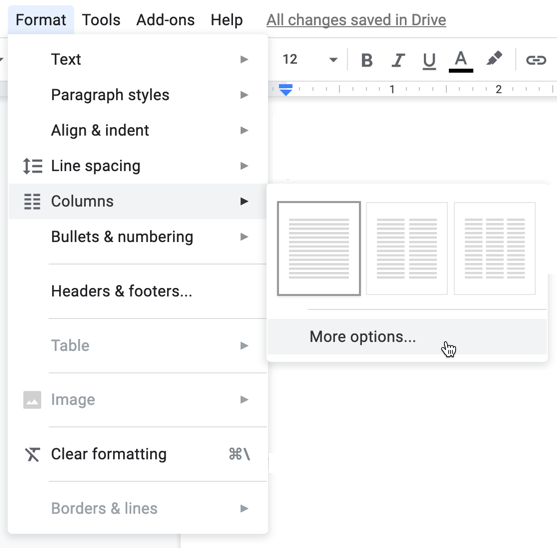
Multiple Columns
Using the tab key or the spacebar to create the visual appearance of multiple text columns can create problems for screen readers accessing the text in the proper reading order. They may jump across columns reading text left-to-right instead of reading down an entire column before moving to the next column. To avoid this problem make sure to use the Columns formatting tool in Google Docs.
To create multiple columns:
- Select all the text that needs multiple column formatting.
- Click the Format menu.
- Select the Columns option and choose the desired column configuration.
- Additional column and alignment options are available from More Options.
Color Contrast
To support people with low vision or color blindness, pay attention to the contrast ratio between text and the document background. Aim for a contrast ratio of at least 4.5:1.

Two good (and free) utilities for checking the color contrast in your documents are:
Color as Context
Never rely exclusively on color to provide information, make a comparison, or to illicit a response. Blind or color-blind users will likely not be able to use this information. Although color can be used in your documents you should also use text-based methods to convey information, instead of relying solely on color.
Bad color example
Items below in red are vegetables:

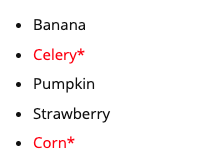
Good Color example
Items below in red (with asterisk) are vegetables:
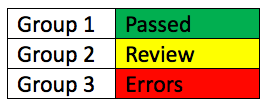
The table below demonstrates effective use of color and text to convey meaning. The color coding supports sighted users while the text descriptions support non-sighted or color blind users (green= "passed", yellow= "review", red= "errors").
Grackle Docs Accessibility Checker for Google Documents
Grackle Docs is an add-on that works in Google Docs. When you run Grackle Docs it scans your document for many types of accessibility barriers. All Michigan Tech students, staff, and faculty can use the full-featured version of Grackle Docs.
Open a Google Doc and select the “Add-Ons” menu in the main ribbon. Select “Get add-ons” and search for Grackle Docs in the Add-ons menu. Click the Install button to add it to your Google account. You can also install the Grackle Docs add-on from this link. To access all the premium features of Grackle Docs you will need to sign in with your MTU email.
Select Grackle Docs from the “Add-ons” menu and choose “Launch”. Grackle Docs will open as a sidebar to the right of your document and will automatically begin checking your document.

Using Grackle Docs to check accessibility
Upon launch, Grackle Docs scans various document components for accessibility issues organized in the categories reviewed below.
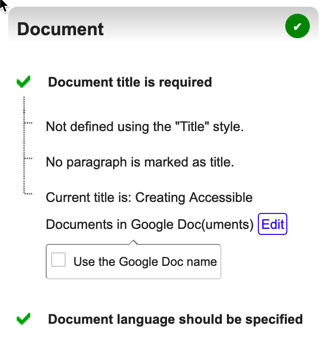
Document
A document title and language should be specified. Clicking on the Document tab in Grackle Docs will expand the menu where you can locate and edit the title as well as set the language of the document. If a Title header is used, Grackle defaults to it as the document title. You also have the option to use the document name as the title. Make sure the document name is well described when choosing this option.
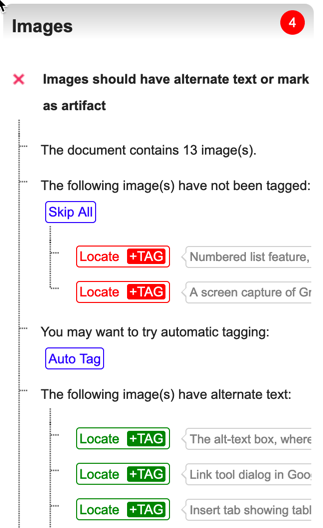
Images
Grackle Docs checks that images, equations, and drawings all have alternative text. It also flags images that appear to be using their filename as alt-text, rather than robust descriptions. All images, equations and drawings, are listed under the Images tab in the Grackle Docs sidebar. Expanding this menu will allow users to locate and edit alternative text for each.
Click on “Locate” to jump to that image in the document. Click on the “+Tag” button to open a dialog box where you can add or edit alternative text.
Images is without alt-text, are grouped separately and marked with a red “+Locate” button. Images that have alt-text are grouped with green “+Locate” buttons. Click on “Locate” to jump to that image in the document. Click on the “+Tag” button to open a dialog box where you can add or edit alternative text. You also have the option of marking images as artifacts (if they are purely decorative elements that convey no important information), and or adding the alternative text to the Google catalog. This allows allows the alt-text description to stay with images that are used in other documents.
Headings
Grackle Docs checks for the heading structure of your document. If no headings are present it will note this as a warning. A warning is also noted if a single “heading 1” element is not present. Finally, Grackle Docs confirms that headings are nested correctly (with no skipped heading levels).
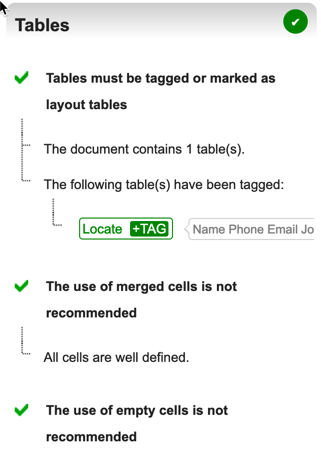
Tables
To ensure accessibility of tables Grackle Docs scans for defined header rows and/or columns. Data tables (like the one below) must be tagged with Row and Column Headers to be accessible. Users of screen readers rely on the header information to understand the structure of the table and the format of the tabular data it contains.
| Name | Phone | |
|---|---|---|
| John Doe | 906-906-9066 | jdoe@mtu.edu |
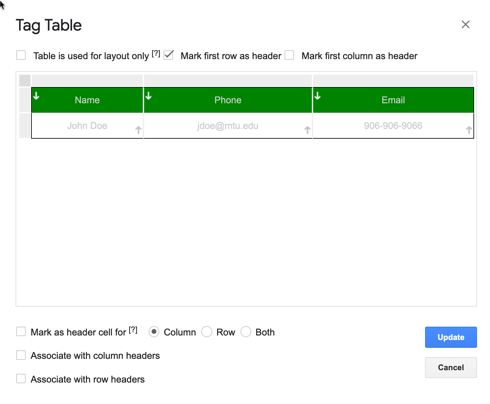
To add or edit table structure click to expand the Tables section in Grackle Docs. Click “Locate” to jump to the table in the document and click the “+Tag” button to access a dialog box where you can identify the header elements within the table. You can identify the first row and/or column of a table as headers, or individually select cells and mark them as headers. Although not recommended, tables used for layout purposes only can be identified as well.
Landmarks
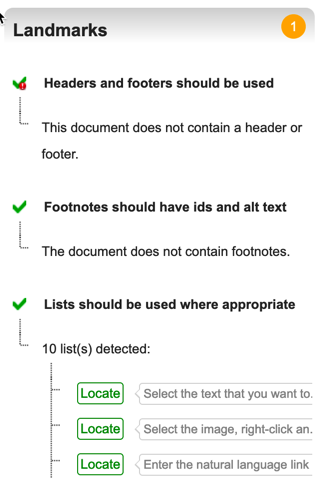
Landmarks are optional elements used in documents like headers, footers, and lists. Grackle Docs checks that headers and footers are used in the document, that footnotes have id’s and alternative text, and that lists are used where appropriate. The tool allows you to locate instances of each of these landmark types within the document.
Contents
Grackle Docs checks the document for various content elements that may create difficulties for some users. Text will low color contrast, fine print and all-caps are flagged. Non-descriptive links are also identified. Basic guidance on how to fix these issues is included.