Creating Accessible Microsoft PowerPoint Presentations
PowerPoint presentations should be accessible to all users, including those with a disability or who use assistive technologies. Accessible presentations are also more usable for everyone. This tutorial will review the most common accessibility issues that should be addressed when creating your PowerPoint presentations.
Slide Themes and Templates
Many of the slide themes and templates available in PowerPoint are designed for accessibility. They contain placeholders for text, images, videos, and more. Color, contrast and font choices in these themes also optimize readability. Choose a template with good contrast between text and the background and avoid any that have distracting backgrounds. Using a good accessible template to create your slides will also help ensure screen readers can accurately read the slide content in the intended order. When you need to customize a slide layout, it's best to begin by adding content from a template slide and then arranging elements as needed.
To add a new slide from a template:
- Select Home > New Slide.
- Choose the slide layout of your choice from dropdown menu.

Alternative Text for Images and Graphics
It is important to provide text-based descriptions (alternative text) of the images and graphical elements that provide relevant information in your presentations. Try to avoid using images that contain text, but if you must, make sure to note the presence of text and its purpose in the alternative text description.
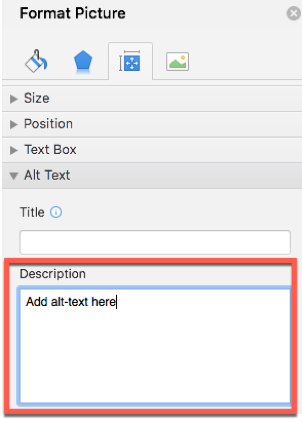
To add alternative text in PowerPoint:
- Right-click on the image.
- Select Format Picture.
- Choose the Size & Properties tab.
- Enter the alt-text information in the Description field.
Make sure to include alternative text for all visual elements in your PowerPoint presentations, such as SmartArt graphics, shapes, charts, and graphs. The procedure for adding alternative text to these items is similar. Right-click the object and select the Format Shape option to access the alternative text field. When adding alternative text, be concise and include the most important information in the first sentence. Complex images like charts and graphs often require a long description in addition to the alternative text. This information should be provided near the image on the slide. If you plan to convert the presentation to PDF for sharing, you may also include the long description information in the slide notes section.
Links
Screen reader users often scan documents and presentations for links. Make sure all links in your presentations are embedded within adequate descriptive text about the destination. Don't use vague or confusing text descriptions for links such as "Click here" or “More info."
Example:
This is an accessible link to the Michigan Tech home page.
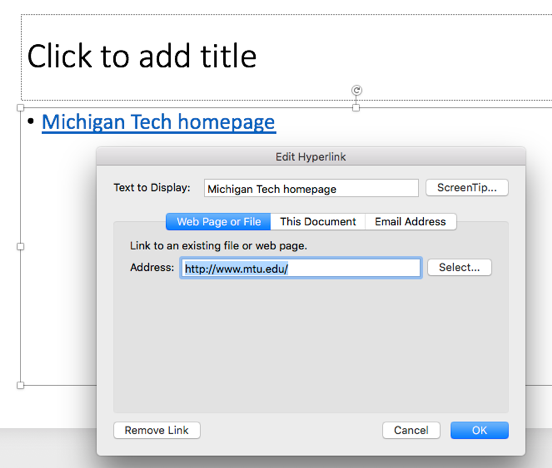
To add descriptive links in PowerPoint:
- Enter the descriptive text for the link destination.
- Select the text description, right-click and choose Hyperlink in the menu.
- Enter the link URL in the address field in the Insert Hyperlink window. We would enter "https://www.mtu.edu/" for Michigan Tech homepage example.
- Click OK to save the link information.
Tip: If you expect users to print your document, including both the full hyperlink text and the descriptive link text may be appropriate.
Example: Michigan Tech home page (www.mtu.edu).
Lists
Use the list creation tools from the Home tab of the PowerPoint ribbon to insert ordered and unordered lists in your presentations. Adding lists by this method is the only way to ensure that a screen reader user accesses the information in a list structure.
Tables
When using tables in PowerPoint keep them simple and make sure to identify the column
header information. Avoid split or merged cells and don't use nested tables. These
attributes create reading order problems for screen readers and can create confusion
for users of this assistive technology.
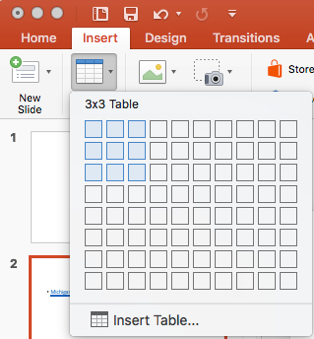
To add a table in PowerPoint:
- Select the Table option from the Insert tab and choose the number of rows and columns needed.
- Click on the table to enable the Design and Layout tabs on the ribbon.
- From the Table Design tab, select Header Row checkbox.
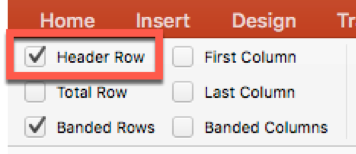
- Type header descriptions in this top row of the table.
Screen readers read table contents from left to right and top to bottom, one cell at a time.
Check the reading order of your table:
- Place your cursor in the first cell of the table.
- Repeatedly press the Tab key and verify the table navigation.
- The tabbed navigation order is what screen readers will use.
Color for Meaning
People with low vision or who are colorblind can miss important information that is conveyed exclusively by color. Make sure to incorporate other ways to signal meaning in addition to color cues. For example, you can use color to draw attention to specific items in a list, but also use an asterisk to identify them. Users who cannot decipher the color red can still get the information via the asterisk notation.
Color Contrast
People with low vision have trouble reading text on backgrounds with a low contrast ratio. A contrast ratio of 4.5:1 is required for normal size text in documents and presentations. PowerPoint templates are designed with adequate color contrast. If you modify these settings make sure to check the contrast ratios in your presentations using free tools.
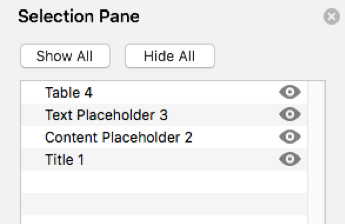
Reading Order
Content on your slides should be in the proper reading order. Screen readers will read the content in this order. Placeholder content on template slides is in proper reading order. Content manually inserted in a slide will be read in the order it is added.
To check the reading order of a slide in PowerPoint:
- Select Home > Arrange > Selection Pane.
- Content is read in reverse order (bottom to top).
- Click and drag items to reorder.
Accessibility Checker
PowerPoint has an Accessibility Checker to help identify errors with your slide content. The task pane for the Accessibility Checker sorts issues by errors, warnings, and tips. At the bottom of the pane additional information is provided on why and how to fix the issues it has identified.
To access the Accessibility Checker in PowerPoint for Windows:
- Select File > Info
- Choose Check for Issue > Check Accessibility
The Accessibility Task Pane will open and show errors, warnings and tips for your presentation
To access the Accessibility Checker in PowerPoint for Mac:
- Select Review tab > Check Accessibility
- Choose Check for Issue > Check Accessibility
The Accessibility Task Pane will open and show errors, warnings and tips for your presentation.