Getting Started
- Go to the Mode Master.
- Select Offline Image.
- Click Browse in the AR Load Path Window to locate the directory you wish to use. If you were just imaging, the images you took during this session should already be loaded into the Browse Graph and Offline Image Manager
- In the Browse Window, double-click on the image you wish to modify/analyze. This will bring up the Display Graph Window for that image as shown below.
Basic Image Editing
Basic edits can be made to the image in the Display Graph Window. This window displays individual image graphs. Each action in this box is considered “local” and will only affect the graph that is currently being displayed.
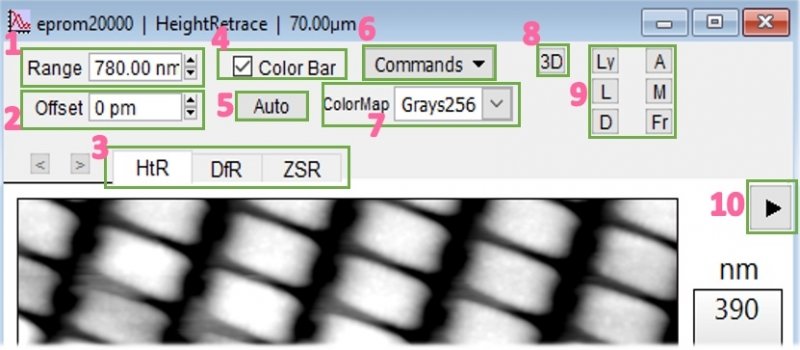
- Range – Adjusts color scale
- Offset – Changes the center of the color range
- Data Tabs – The measured data collected for an image will show individual tabs (amplitude, height, phase, etc.). T or R represents Trace or Retrace.
- Color Bar – Removes or includes the color scale
- Auto Button – Auto adjusts the color scale and offset
- Commands Menu – Lists a variety of functions for editing and saving/exporting the data
- Color Map – Lists all of the available color schemes
- 3D – Renders a 3D plot of the current image
- Also opens the Master ArGL Window which is used for editing the 3D rendering
- Shortcut buttons – Programmable shortcut buttons of the most commonly used functions Since these are
reprogrammable, they might not be the same every time the program is used
- To reprogram the buttons, press Ctrl + Click the button to be reprogrammed. Select the button to be changed, enter a 1 or 2 letter code for it and then choose the function from the drop down list
- Sidebar arrow – shows the specifics of the image when the image was acquired, such as the scan rate, points & lines, setpoint, etc.
Saving Images, Graphs, and Data
Saving Modifications to Images
Modifications done to images are not saved automatically and should be saved as separate files to preserve any raw data.
- Open the List Panel.
- Select the Image in the “Images in Memory” list to be saved.
- Click Save As to Disk.
- Enter a filename.
- Save.
Saving Images
- Select the image to be saved.
- Go to File > Save Graphics.
- Make sure “Same” is selected for the size.
- Select the desired file type (PNG, TIFF, JPEG, and so on).
- Enter a filename.
- Click Do It.
- Navigate to the desired folder.
- Click Save.
Command Menu Method
Tiff Export 1x/2x/4x will export the image as a TIFF.
Note: This method does not include the scale bar that is on the image nor the color bar. Instead, it puts grid axes on the left and bottom part of the image.
Export to Layout
This feature allows any data to be added to a page layout set-up. Multiple graphs or images can be added to a single layout and arranged as desired. Extra objects, such as borders, shapes, and textboxes, can also be added to the layout.
How to Add
- Image: Use the Commands Menu > Export to Layout
- Section Graph: Click Copy to Layout
- Histogram: Click Commands > Layout
How to Save
File > Save Graphics
With this method the layout can be saved as a TIFF/JPEG/PNG and all excess white space will be automatically cropped out.
File > Print Layout
This will give the full page of the layout