It is important to use properly structured HTML headings, instead of bold paragraphs or single lines of all-caps text, when organizing your web content. Think of webpage headings as a book's table of contents. Individuals with functioning vision can quickly scan your website by reading just the headings to gather an understanding of the content. They can focus in on a heading or subheading.
Users without functioning sight can have the same benefit with properly structure headings. Assistive technology can skim through the various headings and subheadings for them. No user, regardless of their abilities or disabilities, will be able to follow a website's story if the headings are non-existent or out of order.
Headings are not required on webpages. However, they help break up and organize lengthy informational webpages—improving readability. Proper heading use also has search engine optimization benefits, which can help your webpages rank higher in Google's search results.
Heading Order
Headings must follow a logical order to be compliant with web accessibility requirements. A webpage should only have one heading level 1 <h1>. This is normally the page title.
Any headings used in your body copy (after your page title) with then be an <h2> or lower. In total you can use headings 2-6. At Michigan Tech, we recommend sticking to headings 2-5 as an <h6> is not typically needed.
Nesting Headings
If you "nest" headings–in other words, if you have a subheading of a heading—do not skip heading levels. If you have an <h2> and want to follow it with a subheading, use an <h3>. If you follow that with a subheading of "equal weight," use an <h3> again. A subhead of a subhead would be <h4>. Once you are done with subheadings you can return to <h2>.
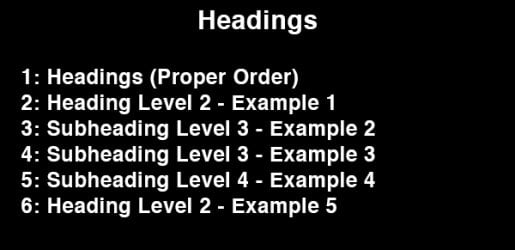
Visual Example
The following is a visual example of how to properly order headings.
Heading Level 2 - Example 1
Lorem ipsum dolor sit amet, consectetur adipiscing elit. Aliquam aliquam lorem dignissim, ultricies lacus quis, venenatis lacus. Suspendisse vitae malesuada velit, ut ullamcorper sem. Sed ut dignissim tortor. Nullam eu lectus sapien.
Subheading Level 3 - Example 2
Lorem ipsum dolor sit amet, consectetur adipiscing elit. Aliquam aliquam lorem dignissim, ultricies lacus quis, venenatis lacus. Suspendisse vitae malesuada velit, ut ullamcorper sem. Sed ut dignissim tortor. Nullam eu lectus sapien.
Subheading Level 3 - Example 3
Lorem ipsum dolor sit amet, consectetur adipiscing elit. Aliquam aliquam lorem dignissim, ultricies lacus quis, venenatis lacus. Suspendisse vitae malesuada velit, ut ullamcorper sem. Sed ut dignissim tortor. Nullam eu lectus sapien.
Subheading Level 4 - Example 4
Lorem ipsum dolor sit amet, consectetur adipiscing elit. Aliquam aliquam lorem dignissim, ultricies lacus quis, venenatis lacus. Suspendisse vitae malesuada velit, ut ullamcorper sem. Sed ut dignissim tortor. Nullam eu lectus sapien.
Heading Level 2 - Example 5
Lorem ipsum dolor sit amet, consectetur adipiscing elit. Aliquam aliquam lorem dignissim, ultricies lacus quis, venenatis lacus. Suspendisse vitae malesuada velit, ut ullamcorper sem. Sed ut dignissim tortor. Nullam eu lectus sapien.
Code Example
The following is a coding example of how to properly order headings.
<h2>Heading Level 2 - Example 1</h2>

<p>Lorem ipsum dolor sit amet, consectetur adipiscing elit. Aliquam aliquam lorem dignissim,
                              ultricies lacus quis, venenatis lacus.</p>

<h3>Subheading Level 3 - Example 2</h3>

<p>Lorem ipsum dolor sit amet, consectetur adipiscing elit. Aliquam aliquam lorem dignissim
                              ultricies lacus quis, venenatis lacus.</p>

<h3>Subheading Level 3 - Example 3</h3>

<p>Lorem ipsum dolor sit amet, consectetur adipiscing elit. Aliquam aliquam lorem dignissim,
                              ultricies lacus quis, venenatis lacus.</p>

<h4>Subheading Level 4 - Example 4</h4>

<p>Lorem ipsum dolor sit amet, consectetur adipiscing elit. Aliquam aliquam lorem dignissim,
                              ultricies lacus quis, venenatis lacus.</p>

<h2>Heading Level 2 - Example 5</h2>

<p>Lorem ipsum dolor sit amet, consectetur adipiscing elit. Aliquam aliquam lorem dignissim,
                              ultricies lacus quis, venenatis lacus.</p>
Example Explanation
Reviewing our example, we have two separate <h2>s: example one and example five. They can be considered equivalent to chapters in a book.
We have two separate <h3>s: example two and example three. They a both subheadings for example one and can be considered equivalent to chapter sections in a book.
We have one <h4> which is a subheading of example three. This can be considered equivalent to a topic within a section of a chapter in a book.
A screen reader, such as VoiceOver, would see our table of contents as follows:
Summary
Properly ordering your headings is important. Avoid using headings to achieve visual-only results. For instance, if you have an announcement that you want to stand out, but which is not a heading for the content afterward—you should not use a heading. Instead, use some CSS to style paragraph text to look unique and stand out. Always think of screen reader users when you are adding headings to your webpage.
Learn More
To learn more about the principles of using proper heading structure:
Modern Campus CMS
In Modern Campus CMS, your page's title is automatically the <h1> of the webpage, so you do not need to apply that heading level yourself. Also keep in mind that sliders titles and sidebar titles are automatically <h2>s. If you choose to nest any headings inside a slider or sidebar, you should begin with the <h3> heading level.
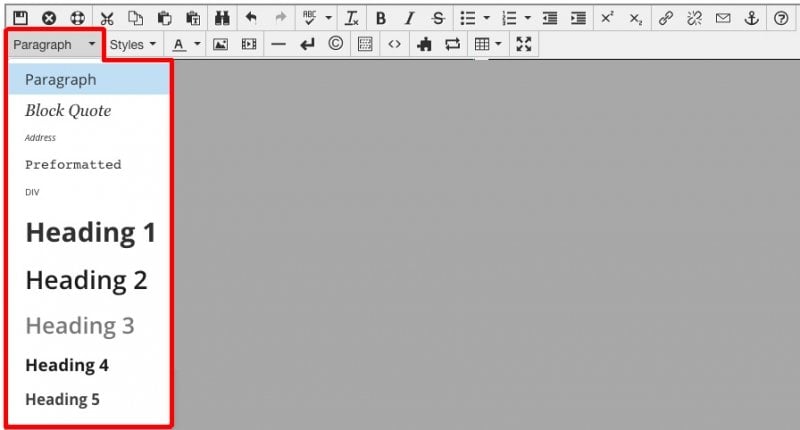
To apply a heading style to a line of text, put your cursor inside of the line of text that you want to turn into a heading and then select a heading level from the left-most dropdown menu in the editor bar.
Note that the same method for creating headings often works in other online applications, such as Google Docs or MS Word.
To learn more about creating special heading styles: